| measurements_in_physics_lab1.docx |
Measurements in Physics

VENIER CALIPER
Laboratory Exploration
Purpose:
· To introduce scientific measuring instruments.
· To practice measuring accurately with these instruments.
· To achieve mastery in reporting measurements to the correct number of significant digits based on the precision of the instruments.
Materials:
- Measurement kit containing: Vernier caliper, micrometer, depth gauge, metric ruler, aluminum square, plastic vial, graduated cylinder, steel ball.
Procedure:
Inner and outer diameters (a.k.a. internal and external diameters)
1. Measure the outer diameter of the plastic graduated cylinder.
1.1 Place the plastic graduated cylinder on the lab table. Hold the cylinder with one hand.
1.2 Using the ruler, measure the distance across the top of the cylinder. Record the distance from the outer edge of one side to the outer edge of the opposite side.
1.3 Record your measurement correctly in centimeters. Convert your centimeters into millimeters. Remember to record the correct number of significant figures.
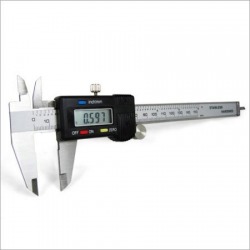
1.4 Measure the outer diameter with the caliper. Using the ridged lines on the lower part of the Vernier caliper, open up the caliper all the way. Place the caliper over the outside edges of the cylinder.
1.5 Carefully slide the sliding scale of the caliper until the lower parallel sides of the caliper touch the cylinder. Observe where the last line on the moveable section of the caliper lies directly under another line. Record your measurement correctly in centimeters. Convert your centimeters into millimeters. Remember to record the correct number of significant figures.
2. Measure the inner diameter of the plastic graduated cylinder.
2.1 Place the graduated cylinder on the lab table. Hold it in one of your hands.
2.2 Using the ruler, measure the distance across the top of the cylinder from the inner edge of one side to the inner edge of the opposite side.
2.3 Record your measurement correctly in centimeters. Convert your centimeters into millimeters. Remember to record the correct number of significant figures.
2.4 Measure the inner diameter of the cylinder with the caliper. Invert the caliper so the upper part of the caliper is inserted into the inside of the cylinder. Place your thumb on the ridged section. Slowly move the caliper until the parallel parts for the internal measurement are touching the sides of the cylinder.
2.5 Carefully observe the inside bottom of the caliper to take your measurement in centimeters. Observe the last line of the bottom of the moveable part of the caliper to determine the internal measurement of the cylinder.
2.6 Convert your centimeters into millimeters. Remember to record the correct number of significant figures.
3. Calculating circumference and volume
3.1 Determine the circumference of the cylinder based on the outer diameter obtained from the ruler in centimeters.
3.2 Repeat the calculation using the diameter obtained from the caliper in centimeters. Record your answers in the correct number of significant figures.
3.3 Determine the depth of the cylinder using the depth gauge accessory on the caliper. Record your answer in centimeters using the correct number of significant figures.
3.4 Calculate the total volume of the cylinder in cubic centimeters using the measurements taken with the ruler and with the measurements taken with the caliper and depth gauge. Record your answer with the correct number of significant figures.
Length, Width, Area and Volume
4. Measure the length, width and height.
4.1 length
width
height
Obtain the aluminum square. Using the ruler, measure and record the length, width and height of the aluminum square. Record your answer in centimeters using the correct number of significant figures.
4.2 Calculate and record the area of the face of the aluminum square. Calculate and record the volume of the aluminum square. Record all data using the correct number of significant figures.
4.3 Measure and record the length, width and height measurements with the caliper. Calculate and record the area of the face of the aluminum square. Calculate and record the volume of the aluminum square. Record all data using the correct number of significant figures.
5. Obtain measurements with a micrometer.
5.1 Remove the micrometer from the measurement kit.
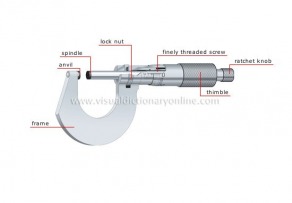
Your micrometer is a precise instrument and should never be over tightened. Place the handle of the cylinder in one hand, and with the other hand, hold the rounded bottom. Turn the revolving barrel counterclockwise. Observe the units of measurement on the rounded shaft. Turn the moveable barrel counterclockwise or clockwise until the 0 line is perfectly horizontal to the horizontal line. Note that one turn of the barrel represents one millimeter.
5.2 Carefully turn the micrometer in a counterclockwise direction until it is opened wider than the height of the aluminum square. Carefully slide the aluminum square into the micrometer. Turn the barrel clockwise until it is touches the aluminum square. Turn the knurled knob on the end of the micrometer one “click” to achieve the desired tightness for measurement – remember: do not over tighten. Record the height of the aluminum square with the correct number of significant figures.
5.3 Calculate the area of the face and volume of the square using the caliper length and width measurements and the micrometer height measurement. Record the area and volume using the correct number of significant figures.
Challenge (optional, as time allows):
6. Measure and record the volume of pulp required to manufacture a sheet of notebook paper. Record your measurements and calculations using the correct number of significant figures.
ANALYSIS

1. Compare and contrast accuracy and precision. Consider how one could improve the accuracy of a measurement? the precision of a measurement?
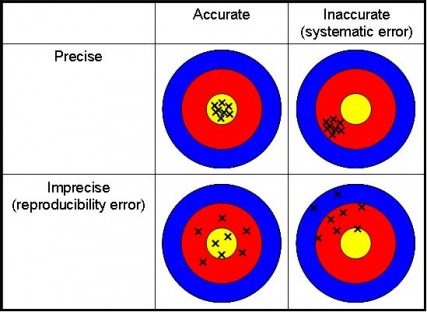
Accuracy of a measurement is how close it is to the "real" value that you are trying to obtain. Being accurate, however, is not the same as being precise. Precision is how close you can get between many measurements.
For example, you can be precise if you take three measurements of a clyinder and each time get 1.98 mm. You could be accurate with the measurement if you read the measurement to 1.9 mm, 2.0 mm and 2.1 mm. All of the measurements are close to one another but are not precise.
One could improve the accuracy of a measurement by using the exact same subject of measurement and use different tools to measure the object every time. It is likely that you will only get a slight deviation in the measurement data. One could improve the precision of a measurement by using a different tool.
A micrometer, for example, would be much more precise in measuring the thickness of an object than a ruler. The results would show that the measurement could be read with more decimal places, and therefore more precisely.
.

2. Compare the number of significant figures in the calculations and measurements taken with the ruler to the measurements taken with the caliper and micrometer. Discuss the differences in precision of these instruments.
The number of significant figures in in the calculations and measurements taken with the ruler to the measurements taken with the caliper are less precise because they do not contain as many significant figures. The same result is shown between the ruler and the micrometer.
The caliper and the micrometer also have a difference in significant figures for the height or thickness measurement. The micrometer thickness measurement is much more precise than that of the caliper because it contains more significant figures.
3. Compare your measurements and calculations with those of a classmate. Are they the same? Discuss sources of error in the accuracy of the measurements.
The measurements and calculations deviated only slightly from that of a classmate. The measurements for the graduated cylinder were only off by millimeters, attributing to human error. The calibration of the instruments may also have been different, permitting a difference in measurements and then calculations at the end of the experiment.
Another source of error and variation between the measurements could be due to where the measurements were taken from. If one group read their measurements at eye level, and the other from above the instrument, the two will vary. The eye distorts the reading of the instrument when taken at different levels, and will result in different data.
4. Which instrument is more precise, the metric ruler, micrometer or caliper?
The most precise instrument is the micrometer because it allows the measurement to be calculated using the most significant figures. The caliper allowed for more precision than the metric ruler, since it also permitted more significant figures to be used to calculate the areas and volumes of the figures. The micrometer, however, was only useful to measure the height or thickness of the aluminum square compared to the caliper that could be used to determine the width and length of the aluminum square. While the ruler was the easiest to use, the caliper was the most useful and precise instrument. The caliper allowed for precision and ease of use for any measurement, whether for the cylinder or the aluminum square.
